I’ve seen a number of users struggling with building PostgreSQL extensions under Visual Studio, so I thought I’d see what’s involved in getting it working. The result is this tutorial, showing how to compile a simple extension with Visual Studio 2010 Express Edition.
Requirements
You will need a supported version of Visual Studio installed. These instructions refer to Visual Studio 2010 Express Edition. It is not necessary to use the same Visual Studio version as PostgreSQL was compiled with, or the same version I’m using here. You do need to make sure your Visual Studio version is supported by the release of PostgreSQL you’re targeting (or modify Configuration Properties -> General -> Platform Toolkit to use an older, supported toolkit). If you’re not using VS 2010, some details will of course differ.
To follow these instructions step by step you’ll also need a 32-bit PostgreSQL install. I’m using 64-bit Windows with a 32-bit Pg so all my paths have (x86) in them; if you’re on 32-bit you’ll need to change any references to Program Files (x86) to just Program Files, but nothing else will change.
If you’re trying to compile a 64-bit extension these instructions will work with minimal changes, but be aware that many free Visual Studio versions do not include a 64-bit toolchain. To test 64-bit builds I landed up installing the Windows SDK 7.1 plus the 64-bit toolchain patches for it, then selecting “WindowsSDK7.1” under Configuration Properties -> General -> Platform Toolkit in project properties.
Bugs and caveats
I’ve only tested against PostgreSQL 9.3, both 32-bit and 64-bit versions, on Windows 7 with MS Visual Studio 2010. I used the v100 (default) toolchain for the 32-bit build, and the Windows SDK 7.1 toolchain for the 64-bit build due to lack of 64-bit compilers in 2010 Express Edition.
The 64-bit PostgreSQL installer is missing libintl.h. I’ve reported this and it’s being fixed. In the mean time you can download libintl.h and put it in PostgreSQL\9.3\include. Here’s the copy from the 32-bit installer in case you’re trying this before the 64-bit installer is fixed.
Step by step
Create a new Project (and new Solution if there isn’t one already) with File->New, Project. Use the Empty Project template. I’ll call my example DemoExtension.
Add the source file
Open the new project tree for DemoExtension. Right-click on “Source files” and choose “Add -> New Item”. Create a new C++ source file with your choice of name. Mine is DemoExtension.c. You must explicitly enter the file extension as .c; otherwise Visual Studio will compile the sources as C++, which won’t work with PostgreSQL.
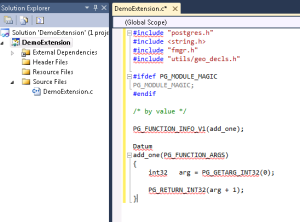
Now paste the example extension code from the PostgreSQL documentation section “Version 1 Calling Conventions” – from the start includes and PG_MODULE_MAGIC to the end of the add_one function. Insert PGDLLEXPORT before Datum on the line before add_one. You should also add a prototype marked PGDLLEXPORT for the function so that MSVC knows to export its symbol.
#include "postgres.h"
#include <string.h>
#include "fmgr.h"
#include "utils/geo_decls.h"

#ifdef PG_MODULE_MAGIC
PG_MODULE_MAGIC;
#endif

/* Add a prototype marked PGDLLEXPORT */
PGDLLEXPORT Datum add_one(PG_FUNCTION_ARGS);

PG_FUNCTION_INFO_V1(add_one);

Datum
add_one(PG_FUNCTION_ARGS)
{
    int32   arg = PG_GETARG_INT32(0);

    PG_RETURN_INT32(arg + 1);
}
Visual Studio doesn’t know where the headers are, so it’ll highlight most of the file with error markers. We need to tell it where PostgreSQL’s headers and libraries are before we can build the project – and make a few other changes while we’re at it.
Project configuration
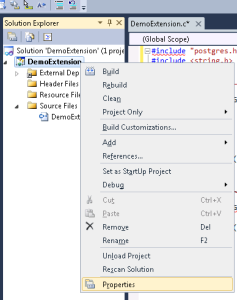
Get properties on the DemoExtension project.
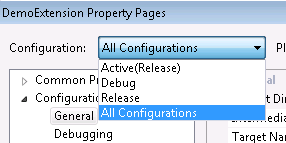
In “Configuration” (top left), choose “All Configurations”.
General settings
Under Configuration Properties -> General, set “Configuration Type” to “Dynamic Library (.dll)”.
Under C/C++ -> Preprocessor Directives, add the directive “WIN32”. PostgreSQL doesn’t recognise “WINDLL” as equivalent so we need to explicitly tell it when we’re on a win32 platform. This will be fixed in a future version.
Under C/C++ -> Code Generation, set “Enable C++ Exceptions” to “No”, and under “Advanced” set “Compile As” to “C Code”.
Under Linker -> Manifest File, set “Generate Manifest” to “No”.
Under Linker -> Input -> Additional Dependencies, add postgres.lib to the library list. Do not uncheck “Inherit from parent or project defaults”. Trivial extensions don’t require this, but if you link to any server functions you’ll require it.
Include and library directories
Now you need to add the required include directories.
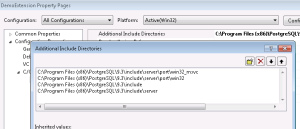
In the properties dialog, go to Configuration Properties -> C/C++ -> General. In Additional Include Directories, pull down the arrow in the right of the textbox and choose “”. Now, by pasting paths or by folder selection, add the following folders inside your PostgreSQL install directory in this order:
include\server\port\win32_msvc
include\server\port\win32
include\server
include
On my system that looks like:
You’ll also need to set the library path. Under “Linker”->”General”, in Additional Library Directories. In my case that’s C:\Program Files (x86)\PostgreSQL\9.3\lib. While you’re there, set Link Library Dependencies to No.
Click “OK”. The error highlights on your extension file should go away when you return to the source file.
Building the project
Choose “Release” from the pull-down menu.
Right-click on your project in the solution explorer and choose “Build”.
You should get no errors in the build output.
Installation and testing
At this point you must fish the DLL out of the project and copy it into PostgreSQL’s lib directory. In my case that means copying C:\Users\Craig\Documents\Visual Studio 2010\Projects\DemoExtension\Release\DemoExtension.dll to C:\Program Files (x86)\PostgreSQL\9.3\lib.
Since we have not defined the control file or setup file for an extension, we’ll just manually load the extension by connecting as user postgres or another superuser, and running:
CREATE FUNCTION add_one(integer) RETURNS integer
     AS 'DemoExtension', 'add_one'
     LANGUAGE C STRICT;
If all goes well, you can now use your brand new extension:
postgres=# CREATE FUNCTION add_one(integer) RETURNS integer
postgres-#      AS 'DemoExtension', 'add_one'
postgres-#      LANGUAGE C STRICT;
CREATE FUNCTION
postgres=# SELECT add_one(4);
 add_one
---------
       5
(1 row)
If you were to deploy your extension to others, you’d want to create a .control file and an extension SQL setup file, per the PostgreSQL documentation.
Related work
Shortly after finishing this, while searching for reports of users who’d been struggling with building extensions on Windows, I found Build PostgreSQL C Functions on Windows by Tim Child. I didn’t use his article as a resource when writing this, and thankfully a few things have improved since then. It looks like a good resource, so if you find yourself stuck take a look at it.


