How to Monitor PostgreSQL 12 Performance with OmniDB - Part 1

OmniDB is an open-source, graphical database management tool developed by 2ndQuadrant, a world-leader in PostgreSQL technologies and services. OmniDB is a browser-based, universal client tool that can manage major database engines like PostgreSQL, MariaDB, MySQL, and Oracle. Other soon-to-be-supported engines include SQLite, Firebird, MS SQL Server, and IBM DB2.
Like any excellent database client software, OmniDB also empowers users with some great features. These include the ability to create and customize database performance monitoring dashboards. In this two-part article series, we will learn how to use OmniDB’s built-in monitoring units – commonly known as “widgets” in dashboard terms – to build performance health checking dashboards for a PostgreSQL 12 replication cluster.
The Test Environment
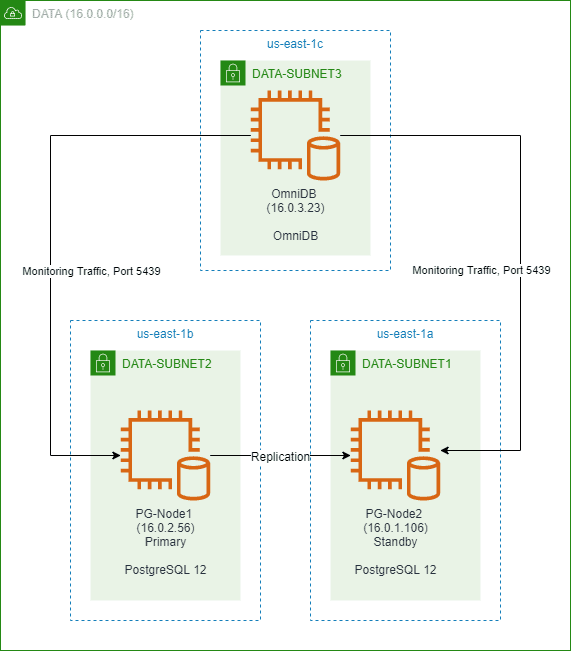
Our test environment is a two-node PostgreSQL 12 cluster, running in an AWS VPC in the us-east-1 region. The VPC spans across three availability zones and has three subnets. Each subnet is in a separate Availability Zone (AZ). The primary and the standby node are located in two of these subnets. The nodes are both t2.large EC2 instance type and will run open-source PostgreSQL 12. The primary node will replicate to the standby node.
There will also be a “monitoring node” running the latest version of 2ndQuadrant’s OmniDB database management tool. This node will not be part of the PostgreSQL cluster, but will be hosted in the third subnet of the VPC, in another AZ. OmniDB will be able to connect to both the master and the standby node and check their performance. The OmniDB node will be a t2.medium EC2 instance.
All three nodes will be running Red Hat Enterprise Linux (RHEL) 8. The image below shows the simplified architecture:
The Test Scenario
Once we have the cluster and OmniDB set up, we will register both PostgreSQL nodes in OmniDB. We will then get familiar with some of the standard monitoring units in OmniDB, and view performance metrics from both the cluster nodes. We will then run a load test in the primary node using pgbench. Ideally, the load test should be initiated from a separate machine, but in this case, we will run it locally. We will then see how OmniDB’s monitoring dashboard shows the changes in various performance counters as the load changes.
Setting up the Environment
Step 1: Installing a PostgreSQL 12 Replication Cluster
To create a two-node PostgreSQL cluster, we are following the steps described in a previously published 2ndQuadrant blog. The reader can check this article to see how we installed a three-node cluster with a witness node using another 2ndQuadrant product called repmgr. For our current setup, we are following the same steps using repmgr to create a two-node cluster instead of a three-node one. Also, the replication cluster will not have any witness node. To keep things simple, this article is not showing the detailed installation and configuration steps.
Once our cluster is set up, we can confirm it’s functioning by querying pg_stat_replication view from the primary node:
SELECT
    usename, client_addr, application_name, state, sent_lsn, write_lsn,replay_lsn
FROM
    pg_stat_replication;
Step 2: Installing and Configuring an OmniDB Server
OmniDB is accessed using a URL, which means behind the scene, it runs a web server of its own. There are two flavors of OmniDB:
- OmniDB Application: This is typically run from a workstation and behaves like a normal desktop application. OmniDB runs the webserver on a random port, and there is no additional setup necessary.
- OmniDB Server: This is for installing OmniDB on a network server for a multi-user mode. In the server mode, we can specify the port number for accessing the URL, SSL encryption of the URL, load balancing and reverse proxy, SSH passthrough access to database nodes, and creating user accounts for access.
For our test scenario, we will install an OmniDB server in the OmniDB EC2 node. First, we are downloading the latest package from the OmniDB site:
# wget https://www.omnidb.org/dist/2.17.0/omnidb-server_2.17.0-centos7-amd64.rpmNext, we start the installation. Here, we are installing OmniDB as the root user, but you can use any other user as long it has the correct rights:
# rpm -ivh omnidb-server_2.17.0-centos7-amd64.rpm
Verifying...                          ################################# [100%]
Preparing...                          ################################# [100%]
Updating / installing...
   1:omnidb-server-2.17.0-0           ################################# [100%]
Once the package is installed, we can start OmniDB from the command prompt:
# omnidb-serverThis shows the server starting:
Starting OmniDB websocket...
Checking port availability...
Starting websocket server at port 25482.
Starting OmniDB server...
Checking port availability...
Starting server OmniDB 2.17.0 at 127.0.0.1:8000.
Starting migration of user database from version 0.0.0 to version 2.17.0...
OmniDB successfully migrated user database from version 0.0.0 to version 2.17.0
Open OmniDB in your favorite browser
Press Ctrl+C to exit
We can see OmniDB has chosen a default webserver port of 8000 and a default websocket server at port 25482.
We press Ctrl+C to stop the server process and browse to the home directory of the root user. We can see there is a hidden folder named .omnidb. Underneath this folder, there’s a subdirectory called omnidb-server. Inside the omnidb-server subdirectory, there are few files:
# ls -la ~
…
drwxr-xr-x.  3 root root       27 Jun 13 02:49 .omnidb
…
…
# ls -la ~/.omnidb
…
drwxr-xr-x. 2 root root  106 Jun 13 02:49 omnidb-server
# ls -la ~/.omnidb/omnidb-server/
…
-rw-r--r--. 1 root root 131072 Jun 13 02:49 db.sqlite3
-rw-r--r--. 1 root root   1209 Jun 13 02:49 omnidb.conf
-rw-r--r--. 1 root root 116736 Jun 13 02:49 omnidb.db
-rw-r--r--. 1 root root      0 Jun 13 02:49 omnidb.db.bak_2.17.0
-rw-r--r--. 1 root root    579 Jun 13 02:49 omnidb.log
Once the server process starts, OmniDB initializes these files. The OmniDB metadata database is called omnidb.db. This is an SQLite database and contains information about database connections, OmniDB users, and so on. The omnidb.conf file contains configuration options for the OmniDB server. If we open this file in an editor, it looks like the following:
# OmniDB Server configuration file

[webserver]
# What address the webserver listens to, 0.0.0.0 listens to all addresses bound to the machine
listening_address    = 127.0.0.1

# Webserver port, if port is in use another random port will be selected
listening_port       = 8000

# Websocket port, if port is in use another random port will be selected
websocket_port       = 25482

# External Websocket port, use this parameter if OmniDB isn't directly visible by the client
# external_websocket_port = 25482
# Security parameters
# is_ssl = True requires ssl_certificate_file and ssl_key_file parameters
# This is highly recommended to protect information
is_ssl               = False
ssl_certificate_file = /path/to/cert_file
ssl_key_file         = /path/to/key_file

# Trusted origins, use this parameter if OmniDB is configured with SSL and is being accessed by another domain
csrf_trusted_origins = origin1,origin2,origin3

# Url path to access OmniDB, default is empty
path =

[queryserver]
# Max number of threads that can used by each advanced object search request
thread_pool_max_workers = 2
# Number of seconds between each prompt password request. Default: 30 minutes
pwd_timeout_total = 1800
OmniDB runs two server processes. One is a web server that displays the user interface, the other is the websocket server. The websocket server is used by several features of the application, like query, console, and debugging.
From the configuration file, we can see that by default OmniDB server accepts local traffic (127.0.0.1) on webserver port 8000. We will change this to ALL IP addresses. Unless the machine is behind a reverse proxy, it’s highly recommended to use SSL encryption for HTTP connections to the server. In our example though, we will leave the is_ssl parameter to “False” because we will tear down this machine once our tests are done. We will also change the webserver port to 8080, and keep the websocket server port to its default value of 25482.
Once changes are made, the config file should look like this:
[webserver]
listening_address    = 0.0.0.0
listening_port       = 8080
websocket_port       = 25482

is_ssl               = False
ssl_certificate_file = /path/to/cert_file
ssl_key_file         = /path/to/key_file
csrf_trusted_origins = origin1,origin2,origin3

path =

[queryserver]
thread_pool_max_workers = 2
pwd_timeout_total = 1800
With the changes made and saved, we run another application called omnidb-config-server. This tool can be used to perform some extra configuration such as:
- Vacuuming the SQLite database OmniDB database
- Reset the old database and create a new one
- Delete temporary files
- Create a new home directory for the database and config file
- Create a superuser for logging into OmniDB
Although we will log into OmniDB using the admin user account that’s created by default, we will create another superuser here. This can be useful if we want to create individual DBA accounts in OmniDB. The snippet below shows this:
# omnidb-config-server --createsuperuser=dba P@$$w0rd123
Creating superuser...
Superuser created.
With the superuser created, we start the omnidb-server process again:
# omnidb-server
Starting OmniDB websocket...
Checking port availability...
Starting websocket server at port 25482.
Starting OmniDB server...
Checking port availability...
Starting server OmniDB 2.17.0 at 0.0.0.0:8080.
User database version 2.17.0 is already matching server version.
Open OmniDB in your favorite browser
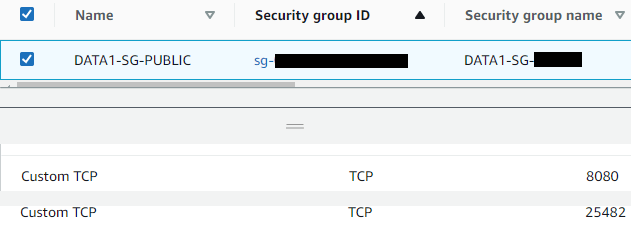
Press Ctrl+C to exitBefore we access the OmniDB interface, we also add port 8080, and port 25482 to the EC2 instance’s security group:
Step 3: Accessing the OmniDB Interface
Browsing to the public address and OmniDB node now shows the login screen:
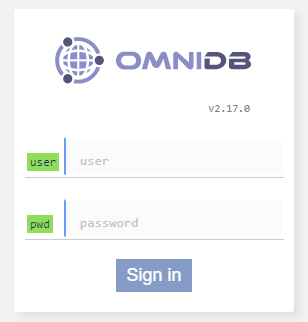
We specify the default username of “admin” and its password, “admin”. This lets us log into the main OmniDB interface. The first screen is shown below:
Next, we click on the “Manage Users” icon on the top right corner of the screen:
![]()
And change the default password of the admin user:
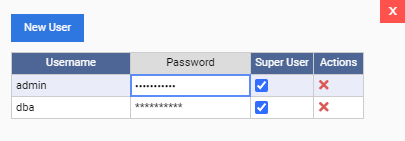
Once done, we click on the “Save Data” button to update the password. As you can see, we can also create new users from this screen.
From the left-upper corner of the screen, we click on the “Connections” link, and then from the resulting dialog box, click on the “New Connection” button:


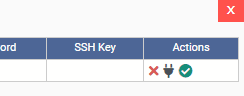
We then specify the connection details for the primary PostgreSQL node and click on the “Save Data” button:

Once the connection is saved, we click on the connection icon (green tick mark) from the “Actions” column.
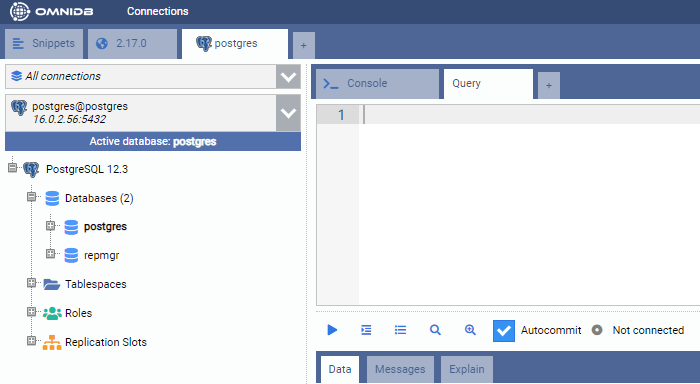
This opens a new tab showing the database connection. As shown here, we are connected to the primary PostgreSQL node here:
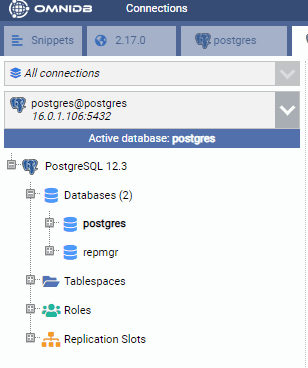
We follow the same process to register the standby node:
Step 4: Restoring a Sample Database
We are now restoring a sample database in the primary PostgreSQL instance. This database is called “DVDRental” and it’s freely downloadable from the PostgreSQL Tutorial site. We have unzipped the downloaded file and extracted the source files into a subdirectory under the /tmp folder of the primary node:
[root@PG-Node1 dvdrental] # ls -la
total 2796
drwxr-xr-x. 2 root     root         280 Jun 16 11:32 .
drwxrwxrwt. 9 root     root         257 Jun 16 11:31 ..
-rw-------. 1 postgres postgres   57147 May 12  2019 3055.dat
-rw-------. 1 postgres postgres    8004 May 12  2019 3057.dat
-rw-------. 1 postgres postgres     483 May 12  2019 3059.dat
-rw-------. 1 postgres postgres  333094 May 12  2019 3061.dat
-rw-------. 1 postgres postgres  149469 May 12  2019 3062.dat
-rw-------. 1 postgres postgres   26321 May 12  2019 3063.dat
-rw-------. 1 postgres postgres   46786 May 12  2019 3065.dat
-rw-------. 1 postgres postgres   21762 May 12  2019 3067.dat
-rw-------. 1 postgres postgres    3596 May 12  2019 3069.dat
-rw-------. 1 postgres postgres  140422 May 12  2019 3071.dat
-rw-------. 1 postgres postgres     263 May 12  2019 3073.dat
-rw-------. 1 postgres postgres  718644 May 12  2019 3075.dat
-rw-------. 1 postgres postgres 1214420 May 12  2019 3077.dat
-rw-------. 1 postgres postgres     271 May 12  2019 3079.dat
-rw-------. 1 postgres postgres      57 May 12  2019 3081.dat
-rw-------. 1 postgres postgres   45872 May 12  2019 restore.sql
-rw-------. 1 postgres postgres   55111 May 12  2019 toc.dat
Next, we run the following shell commands in the primary PostgreSQL instance (PG-Node1). These commands make some changes to the restore.sql file:
- Remove all occurrences of “$$PATH$$/”. This ensures the script can find all the data files in the same directory
- Change all occurrences of “English_United States.1252” to “en_US.UTF-8”. This ensures there are no errors due to a missing locale when the script runs.
- Change the “DROP DATBASE dvdrental” command to “DROP DATBASE IF EXISTS dvdrental”, so there is no invalid database error showing up.
# sed -i 's/$$PATH$$\//\/tmp\/dvdrental\//g' /tmp/dvdrental/restore.sql
# sed -i 's/English_United States.1252/en_US.UTF-8/g' /tmp/dvdrental/restore.sql
# sed -i 's/DROP DATABASE dvdrental;/DROP DATABASE IF EXISTS dvdrental;/g' /tmp/dvdrental/restore.sql
Next, we switch to the postgres user and run the following command from the shell prompt:
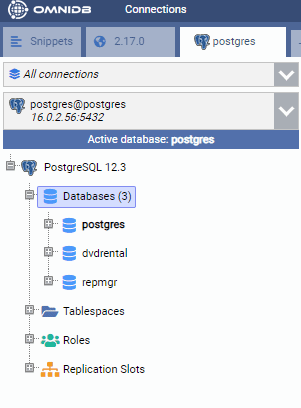
$ psql -U postgres -d postgres -f /tmp/dvdrental/restore.sqlThis restores the sample database in the primary node. If we check from OmniDB, we can see the database is created:
Conclusion
We now have a fully functioning PostgreSQL cluster and an OmniDB instance running in AWS. OmniDB can connect to both the nodes of the cluster. We have also restored a database in the primary node which is being replicated to the standby.
The environment set up is now complete. In the second part of this article, we will start creating a performance monitoring dashboard for the primary instance.