How to Protect Your PostgreSQL Databases from Cyberattacks with SQL Firewall


In today’s world, organizations increasingly face an unprecedented level of threat of cyberattacks against their information assets.
Cyberattacks can come in many forms. One such attack is called SQL injection. With SQL injection, rogue players target the backend database of any system. Usually, these systems are public-facing. Hackers try to send seemingly innocuous and regular queries to a database – except with parameters which can expose information they are not supposed to see, or corrupt the database with wrong information, or crash the system.
Cybersecurity specialists are always racing against time to stay ahead of the sophistication of these attacks, and like most big wars, it’s now fought at every front. This means security must be implemented at every layer of an application’s stack – including the database layer.
Seasoned DBAs typically try to secure databases with measures like role-based access control (RBAC), federated authentication, auditing, or SSL. However, any extra measure to secure the database should also be considered.
One such protection measure is a database firewall. Like regular firewalls, database firewalls filter out traffic based on a whitelist or blacklist. They can also “learn” from system access patterns to understand what statements can be trusted and what can’t. Using a tool like this adds a strong layer of protection against SQL injection.
In this article, we will talk about SQL Firewall, a database firewall for protecting PostgreSQL databases. SQL Firewall is built and supported by 2ndQuadrant, a leader in PostgreSQL technologies.
How SQL Firewall Works
SQL Firewall comes as an extension to PostgreSQL 9.4 and above. Although it’s currently supported up to PostgreSQL version 10, further work is ongoing to support later versions.
Since it’s an extension, SQL Firewall is very simple to install and configure. Once configured, it can be used to whitelist SQL statements against databases for individual users. The whitelisting comes from “training” the extension with an application’s typical workload – usually coming from repeated runs of a suite of tests covering all possible scenarios. Once the whitelisting is fine-tuned and finalized, it can be exported and then imported into other PostgreSQL instances serving similar workloads.
For example, before the launch of an application, each configured user can run production-quality sample workloads against the database in a controlled environment. A human user account may be allowed to run only read-only queries while an application user account could be allowed to run both reads and writes. SQL Firewall then whitelists read queries for both human and application user accounts and write queries for the application user account only. If a human user then tries to run an INSERT, DELETE or UPDATE, SQL Firewall will then deny the operation. As the application evolves, the whitelist can also be retrained with the changing workload.
Every blocked statement is logged by SQL Firewall, which means operations teams can send these logs to their log management solutions and get alerted every time there is an exception.
Setting up the Environment
In this article, we will install SQL Firewall for a single-node PostgreSQL 10 instance running on Red Hat Enterprise Linux 7. At the time of writing, RHEL/CentOS 7 and PostgreSQL 10 are the highest supported versions. However, as mentioned before, further support is coming along.
Note
[Please note that SQL Firewall is a commercially licensed product available to 24/7 Support customers. It is not available for download from the 2ndQuadrant public website.]
Step 1: Installing PostgreSQL 10
Our test system is an Amazon EC2 instance running Red Hat Enterprise Linux 7.2.
# cat /etc/redhat-release
Red Hat Enterprise Linux Server release 7.2 (Maipo)
We run the following command to download the RPM repo for PostgreSQL 10 (x86-64).
# yum install https://download.postgresql.org/pub/repos/yum/reporpms/EL-7-x86_64/pgdg-redhat-repo-latest.noarch.rpm -yNext, we install the server and the client package.
# yum install postgresql10-server postgresql10 -yOnce the packages are successfully installed, we run the initdb command to initialize the database.
# /usr/pgsql-10/bin/postgresql-10-setup initdb

Initializing database ... OK
Next, we make the following change to the postgresql.conf file. By default, it’s under the /var/lib/pgsql/10/data/ directory.
listen_addresses = '*'And then, add the following line to the pg_hba.conf file (again, by default, it’s under the /var/lib/pgsql/10/data/ directory).
host all all <our IP address range> md5We then start the PostgreSQL service and enable it to start automatically.
# systemctl start postgresql-10.service
# systemctl enable postgresql-10.service
Finally, we log into the database instance from psql as the postgres user and change the password.
# su - postgres
-bash-4.2$ psql
psql (10.12)
Type "help" for help.

postgres=# \password
Enter new password:
Enter it again:
postgres=#
Step 2: Restore Sample Databases
To emulate a production system, we have restored two sample databases in our PostgreSQL server. These databases are publicly available:
- Pagila: the PostgreSQL version of the popular MySQL Sakila database
- Chinook: a database about digital media store
Step 3: Create Roles and Users
With the databases created, we create two user roles. One is called “human_user”, the other one is called “app_user”.
The human_user role represents any person accessing the database from the back-end or with a client tool. The app_user role represents the account an application will use to connect to the database.
psql -d postgres -c "CREATE ROLE human_user WITH  NOSUPERUSER NOCREATEDB NOCREATEROLE NOINHERIT LOGIN NOREPLICATION PASSWORD '<a tough password>';"
psql -d postgres -c "CREATE ROLE app_user WITH  NOSUPERUSER NOCREATEDB NOCREATEROLE NOINHERIT LOGIN NOREPLICATION PASSWORD '<a tough password>';"
The user roles are then granted permission to access the chinook and the pagila databases by running the following commands as the postgres user:
$ psql -d postgres -c "GRANT CONNECT ON DATABASE pagila, chinook TO app_user;"

$ psql -d chinook -c "GRANT USAGE ON SCHEMA public TO app_user;"
$ psql -d chinook -c "GRANT USAGE, SELECT ON ALL SEQUENCES IN SCHEMA public TO app_user;"
$ psql -d chinook -c "GRANT SELECT, INSERT, UPDATE, DELETE, TRUNCATE, TRIGGER, REFERENCES ON ALL TABLES IN SCHEMA public TO app_user;"
$ psql -d chinook -c "GRANT EXECUTE ON ALL FUNCTIONS IN SCHEMA public TO app_user;"

$ psql -d pagila -c "GRANT USAGE ON SCHEMA public TO app_user;"
$ psql -d pagila -c "GRANT USAGE, SELECT ON ALL SEQUENCES IN SCHEMA public TO app_user;"
$ psql -d pagila -c "GRANT SELECT, INSERT, UPDATE, DELETE, TRUNCATE, TRIGGER, REFERENCES ON ALL TABLES IN SCHEMA public TO app_user;"
$ psql -d pagila -c "GRANT EXECUTE ON ALL FUNCTIONS IN SCHEMA public TO app_user;"

$ psql -d postgres -c "GRANT CONNECT ON DATABASE pagila, chinook TO human_user;"

$ psql -d chinook -c "GRANT USAGE ON SCHEMA public TO human_user;"
$ psql -d chinook -c "GRANT USAGE, SELECT ON ALL SEQUENCES IN SCHEMA public TO human_user;"
$ psql -d chinook -c "GRANT SELECT, INSERT, UPDATE, DELETE, TRUNCATE, TRIGGER, REFERENCES ON ALL TABLES IN SCHEMA public TO human_user;"
$ psql -d chinook -c "GRANT EXECUTE ON ALL FUNCTIONS IN SCHEMA public TO human_user;"

$ psql -d pagila -c "GRANT USAGE ON SCHEMA public TO human_user;"
$ psql -d pagila -c "GRANT USAGE, SELECT ON ALL SEQUENCES IN SCHEMA public TO human_user;"
$ psql -d pagila -c "GRANT SELECT, INSERT, UPDATE, DELETE, TRUNCATE, TRIGGER, REFERENCES ON ALL TABLES IN SCHEMA public TO human_user;"
$ psql -d pagila -c "GRANT EXECUTE ON ALL FUNCTIONS IN SCHEMA public TO human_user;"
Step 4: Installing SQL Firewall
Installing SQL Firewall is a straightforward process. First, we install the package.
# rpm -ivh postgresql10-sqlfirewall-3.0-1.el7.x86_64.rpm

warning: postgresql10-sqlfirewall-3.0-1.el7.x86_64.rpm: Header V4 RSA/SHA1 Signature, key ID ******: NOKEY
Preparing...                          ################################# [100%]
Updating / installing...

1:postgresql10-sqlfirewall-3.0-1.el################################# [100%]
Then we update the postgresql.conf file by changing the shared_preload_libraries parameter.
shared_preload_libraries = 'sqlfirewall'Once done, we restart the PostgreSQL service.
# systemctl restart postgresql-10.serviceOnce the service is restarted, we log into the instance as the postgres user and add the extension to both the sample databases.
$ psql -U postgres -d chinook -c "CREATE EXTENSION sqlfirewall;"
Password for user postgres:
CREATE EXTENSION
-bash-4.2$ psql -U postgres -d pagila -c "CREATE EXTENSION sqlfirewall;"
Password for user postgres:
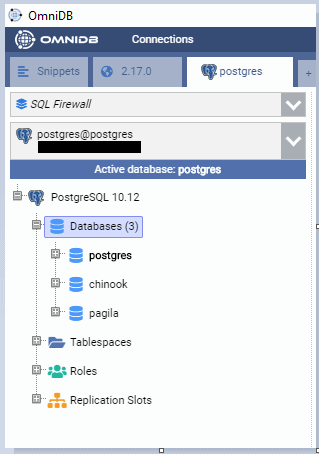
CREATE EXTENSIONThe image below shows the extensions installed on both the databases. Note how there is a special schema called “sqlfirewall” also created in both databases. This schema contains all the database objects related to SQL Firewall’s operation.

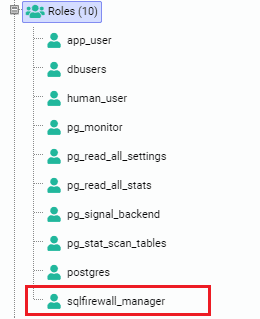
We can also see a new role named “sqlfirewall_manager” is automatically created. Users who are added to this role can access functions and views in the sqlfirewall schema.
Step 5: Configuring SQL Firewall
A number of parameters are then added to the postgresql.conf file. For Red Hat Enterprise Linux and it’s derivatives distros, the default directory location for this file is /var/lib/pgsql/10/data/.
In the following code snippet, we are editing the file and adding a number of parameters.
# vim /var/lib/pgsql/10/data/postgresql.conf

sqlfirewall.whitelist = 'verbose'
sqlfirewall.track = 'all'
sqlfirewall.track_utility = 'true'
sqlfirewall.save = 'true'
Then we reload all configuration.
$ psql -U postgres -d postgres
Password for user postgres:
psql (10.12)
Type "help" for help.

postgres=# SELECT pg_reload_conf();
 pg_reload_conf
----------------
 t
(1 row)
Next, we let the process sleep for a second.
postgres=# SELECT pg_sleep(1);
 pg_sleep
----------
(1 row)
and then check the whitelisting status in both databases. If the steps were followed, both databases should have whitelisting enabled.
postgres=# \connect pagila
You are now connected to database "pagila" as user "postgres".
pagila=# show sqlfirewall.whitelist;
 sqlfirewall.whitelist
-----------------------
 verbose
(1 row)

pagila=# \connect chinook;
You are now connected to database "chinook" as user "postgres".
chinook=# show sqlfirewall.whitelist;
 sqlfirewall.whitelist
-----------------------
 verbose
(1 row)
Let’s go through the parameters we just added.
The sqlfirewall.whitelist parameter is used to enable the firewall’s whitelisting functionality. This parameter can have either of two values: “verbose” or “protect”.
With the verbose option, SQL Firewall will show a warning message to the user when they try to run a non-whitelisted query that they are not permitted to do so. When the value is set to protected, SQL Firewall will show a generic “permission denied” message. As a best practice, we recommend setting the value to “protect”, which does not give the hacker any idea why the command is rejected. We have set this parameter to “verbose” for demonstration purpose only.
The values assigned to the sqlfirewall.track and the sqlfirewall.track_utility parameters ensure SQL Firewall is tracking all statements for whitelisting purposes.
Finally, setting the sqlfirewall.save parameter to “true” ensures the whitelisted statements are persisted even if the server is rebooted.
Running SQL Firewall
Running SQL Firewall involves invoking a number of functions that come with the extension.
Step 1: Understanding SQL Firewall Functions
The SQL Firewall extension creates a number of functions in the sqlfirewall schema of the database where it’s installed. Most of these functions can be executed only by superusers or members of the sqlfirewall_manager role.
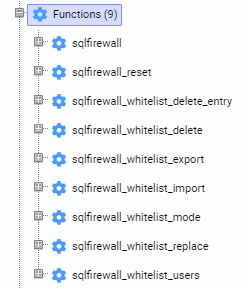
Let’s quickly go through some of these functions.
sqlfirewall_whitelist_mode is the main function we will be working with. This function enables the statement whitelisting for a particular PostgreSQL user. It takes two parameters: one is the username, the other is the whitelist_mode.
The whitelist_mode parameter can have three values:
- When it’s set to “RECORD”, SQL Firewall will record all statements executed by the user in the user’s whitelist
- When set to “ENFORCE”, SQL Firewall will enforce the whitelist. Any statement not included in the whitelist will cause an error
- The value of “OFF” turns off whitelisting functionality for the user, and the user will not be able to execute any queries at all
If you want to remove the whitelisted queries for a user, run the sqlfirewall_whitelist_delete function instead. This function takes a single parameter: the username. Once run, the sqlfirewall_whitelist_delete function removes all whitelisted statements for the user.
The sqlfirewall_whitelist_delete_entry function is used to remove individual query IDs from a user’s whitelist. This can be useful when you have too many allowed queries for a user and want to fine-tune it. The function takes two parameters: the username and the query ID. You can find the ID of the query you want to exclude from the whitelist by looking at the sqlfirewall view.
The sqlfirewall_whitelist_users function does not take any parameter. It returns a list of users who have whitelisting enabled for their account.
You can export the whitelist for a user using the sqlfirewall_whitelist_export function. This function takes two parameters: the username and the file name where it exports the user’s whitelisted statements. The file must be in a location where the PostgreSQL server process has write access to.
Similar to the sqlfirewall_whitelist_export function, the sqlfirewall_whitelist_import function is used to import an exported whitelist file for a user to a different PostgreSQL instance for that user. This function also takes two parameters, the username, and the file to be imported. The file must be in a location where the PostgreSQL server process can read it from.
Also, the target database needs to be a binary copy of the source database – that means, the target has to be part of a streaming replication or a PostgreSQL instance created from a source with the pg_basebackup command. Databases created from a logical dump of the source database cannot import the whitelist file – in such cases, the whitelisting has to be configured manually.
Step 2: Enabling Whitelisting for Users
Now that we have some ideas about the SQL Firewall functions, let’s start the whitelisting process for both the human_user and the app_user in the pagila and the chinook databases.
In the code snippet below, we are running the following commands as the postgres superuser.
postgres=# \connect pagila
You are now connected to database "pagila" as user "postgres".
pagila=# SELECT sqlfirewall.sqlfirewall_whitelist_mode('human_user', 'RECORD');
 sqlfirewall_whitelist_mode
----------------------------
 t
(1 row)

pagila=# SELECT sqlfirewall.sqlfirewall_whitelist_mode('app_user', 'RECORD');\
 sqlfirewall_whitelist_mode
----------------------------
 t
(1 row)

pagila=# \connect chinook
You are now connected to database "chinook" as user "postgres".
chinook=# SELECT sqlfirewall.sqlfirewall_whitelist_mode('human_user', 'RECORD');
 sqlfirewall_whitelist_mode
----------------------------
 t
(1 row)

chinook=# SELECT sqlfirewall.sqlfirewall_whitelist_mode('app_user', 'RECORD');
 sqlfirewall_whitelist_mode
----------------------------
 t
(1 row)
We can also confirm by running the sqlfirewall_whitelist_users() function.
$ psql -U postgres -d pagila -c "SELECT sqlfirewall.sqlfirewall_whitelist_users();"
Password for user postgres:
 sqlfirewall_whitelist_users
-----------------------------
 (17479,human_user,RECORD)
 (17480,app_user,RECORD)
(2 rows)

$ psql -U postgres -d chinook -c "SELECT sqlfirewall.sqlfirewall_whitelist_users();"
Password for user postgres:
 sqlfirewall_whitelist_users
-----------------------------
 (17479,human_user,RECORD)
 (17480,app_user,RECORD)
(2 rows)
Step 3: Running a Workload
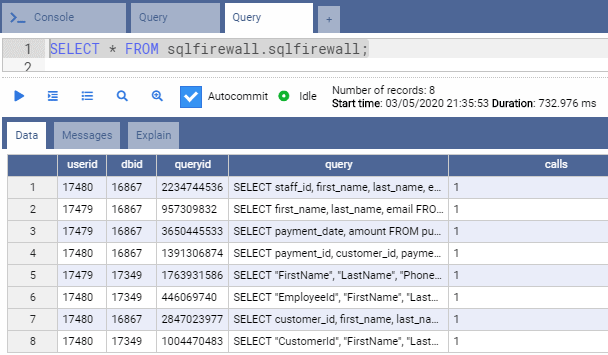
With the whitelisting enabled and recording, we switch to the app_user account and run some queries as shown below. Notice how the app_user is selecting various “ID fields” (customer_id, staff_id, EmployeeID, etc.) from different tables.
postgres=# \c - app_user
Password for user app_user:
You are now connected to database "postgres" as user "app_user".
postgres=> \connect pagila
You are now connected to database "pagila" as user "app_user".
pagila=> SELECT customer_id, first_name, last_name, email FROM public.customer;
...
pagila=> SELECT payment_id, customer_id, payment_date, amount FROM public.payment;
...
pagila=> SELECT staff_id, first_name, last_name, email FROM public.staff;
...
pagila=> \connect chinook;
You are now connected to database "chinook" as user "app_user".
chinook=> SELECT "CustomerId", "FirstName", "LastName", "Phone" FROM public."Customer";
...
chinook=> SELECT "EmployeeId", "FirstName", "LastName", "Phone", "Email" FROM public."Employee";
...
Next, we switch to the human_user account and run some simple queries on some of the tables the app_user accessed.
postgres=# \c - human_user
Password for user human_user:
You are now connected to database "postgres" as user "human_user".
postgres=> \connect pagila;
You are now connected to database "pagila" as user "human_user".
pagila=> SELECT payment_date, amount FROM public.payment;
...
pagila=> SELECT first_name, last_name, email FROM public.customer;
...
pagila=> \connect chinook;
You are now connected to database "chinook" as user "human_user".
chinook=> SELECT "FirstName", "LastName", "Phone", "Email" FROM public."Employee";
...
If we query the sqlfirewall view from any of the databases as the postgres user, we can see the queries that were whitelisted for each user.
Step 4: Enforcing Whitelist
With a sample workload now captured, we enforce the whitelist for both user accounts in both databases by running the following commands. The commands have to be run by a superuser; in this case, we are running these as the user postgres.
postgres=# \connect pagila;
You are now connected to database "pagila" as user "postgres".
pagila=# SELECT sqlfirewall.sqlfirewall_whitelist_mode('human_user', 'ENFORCE');
 sqlfirewall_whitelist_mode
----------------------------
 t
(1 row)

pagila=# SELECT sqlfirewall.sqlfirewall_whitelist_mode('app_user', 'ENFORCE');
 sqlfirewall_whitelist_mode
----------------------------
 t
(1 row)

pagila=# \connect chinook;
You are now connected to database "chinook" as user "postgres".
chinook=# SELECT sqlfirewall.sqlfirewall_whitelist_mode('human_user', 'ENFORCE');
 sqlfirewall_whitelist_mode
----------------------------
 t
(1 row)

chinook=# SELECT sqlfirewall.sqlfirewall_whitelist_mode('app_user', 'ENFORCE');
 sqlfirewall_whitelist_mode
----------------------------
 t
(1 row)
Step 5: Testing
To test the whitelisting, we logged in to the pagila database as the human_user and tried to run the commands that were run before
chinook=# \c - human_user;
Password for user human_user:
You are now connected to database "chinook" as user "human_user".
chinook=> \connect pagila;
You are now connected to database "pagila" as user "human_user".

pagila=> SELECT payment_date, amount FROM public.payment;
...
pagila=> SELECT first_name, last_name, email FROM public.customer;
...
The commands succeed. This is because these commands were run by the human_user before and were whitelisted.
Now we try to run the following command. Note how the human_user is trying to run a query with two extra fields. This query was run by the app_user before.
pagila=> SELECT payment_id, customer_id, payment_date, amount FROM public.payment;The statement fails with a message like this:
ERROR: Execution of non-whitelisted statement prohibitedThis is happening because the human_user had previously run a command to select only two fields from this table, not the extra fields (payment ID and customer ID) he is trying to access now. SQL Firewall recorded his previous query as a known workload and whitelisted that query. As he tries to add those two new fields in his query, the firewall is blocking him.
If you think about it, this is how a hacker might want to steal an ID field value so it can be used in the WHERE clause of another query to get further information. Using a whitelisting method effectively blocks that.
So, what happens if the user needs these two extra fields for legitimate purpose? In such a case the whitelist mode for the user needs to be changed back to “RECORD” again so that the new queries can run, and SQL Firewall can whitelist them.
Let’s run another test before we wrap up. This time, we will assume a hacker has compromised the app_user account and wants to run a delete statement against the “payment” table. Remember that we had granted the user DELETE and TRUNCATE privileges on the table.
So we log in as the app_user, and run a DELETE statement.
pagila=> \c - app_user
Password for user app_user:
You are now connected to database "pagila" as user "app_user".
pagila=> DELETE FROM public.payment;
ERROR:  Execution of non-whitelisted statement prohibited
Conclusion
The statement is denied because it’s not whitelisted. Even when the user has the right to delete data from the table, SQL Firewall has rightly blocked it.
As you can see, SQL Firewall is a powerful security tool. It has safety features that allow it to be used on a pseudo-production mode. In this mode, a test user can be configured to have its statements whitelisted and then functionality can be tested.
DBAs and system administrators, however, need to be aware of a few points:
First of all, when a user’s whitelist mode is set to “RECORD”, SQL Firewall does not stop the user from running any query. In other words, SQL Firewall has to be first trained before it can block a user. That’s why it’s important to ensure normal database access privileges are also applied to any user account. This is all the more important because members of the superuser and sqlfirewall_manager roles are exempted from the firewall rules. SQL Firewall is not the replacement for existing database security – it’s there to complement it.
Secondly, when whitelisting individual SELECT, INSERT, UPDATE, and DELETE statements, SQL Firewall will treat object names used in these commands written in different cases (uppercase, mixed case or lowercase) as the same. All other commands will be compared on the basis of the textual query strings. So, for example, SQL Firewall will treat “BEGIN” and “begin” and “Begin” as part of separate queries.
Third, SQL Firewall’s whitelist does not automatically replicate across to standby nodes in a replication environment. However, you can export whitelists using the sqlfirewall_whitelist_export function and import it into another server using the sqlfirewall_whitelist_import function. Unfortunately backing up the database or the sqlfirewall schema and restoring in the target instance won’t work. Also, the target server needs to have the same user account present for the whitelist to be useful.
There needs to be careful consideration of all possible types of queries a user can perform against a database and run the whitelisting in “RECORD” mode for as long as necessary to capture all normal workloads. Too little capture can restrict a user account from running legitimate queries, whereas recording for too long can unnecessarily add commands to the whitelist. This can cause delays for SQL Firewall when it compares statements in enforcement mode.