Import Export Servers in pgAdmin 4

Import Export Servers in pgAdmin 4
pgAdmin 4 provides the facility to import/export database servers. This feature allows users to export existing database servers in JSON format and share them with others. Similarly users can import the database servers from the JSON file.
How to use the Import/Export Servers wizard
To launch the Import/Export Servers wizard, navigate through Tools on the menu bar to click on the ‘Import/Export Servers’ option.
Step 1
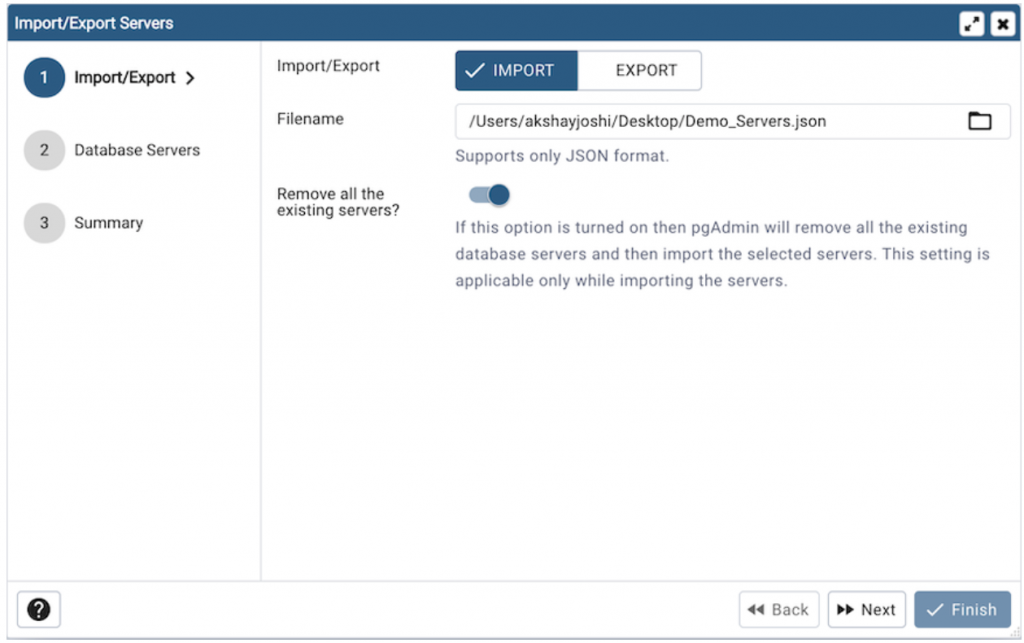
- Use the Import/Export field to select the Server Groups/Servers to be imported or exported.
- Use the Filename field to select the JSON file to import servers or create a new file in case of Export where the servers to be exported in the JSON format.
- Use the Remove all the existing servers? field to specify whether to remove all the existing servers or not before importing the new selected servers. This field is applicable only in the case of Import Servers.
- Click the Next button to continue, or the X button to close the wizard.
Step 2
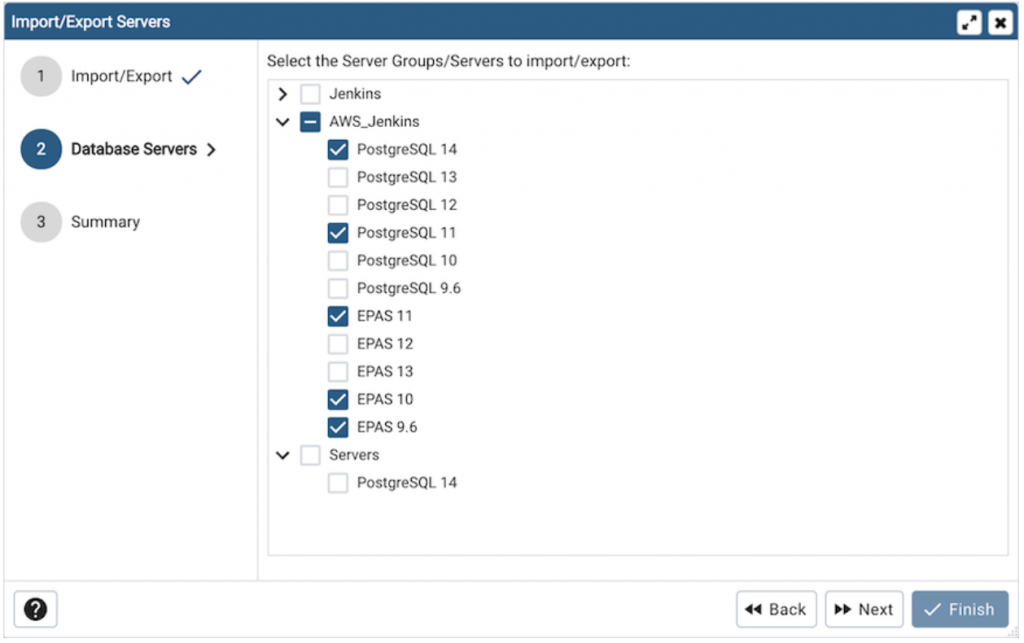
- Select the Server Groups/Servers to be imported or exported.
- Click the Next button to continue, or the X button to close the wizard.
Step 3
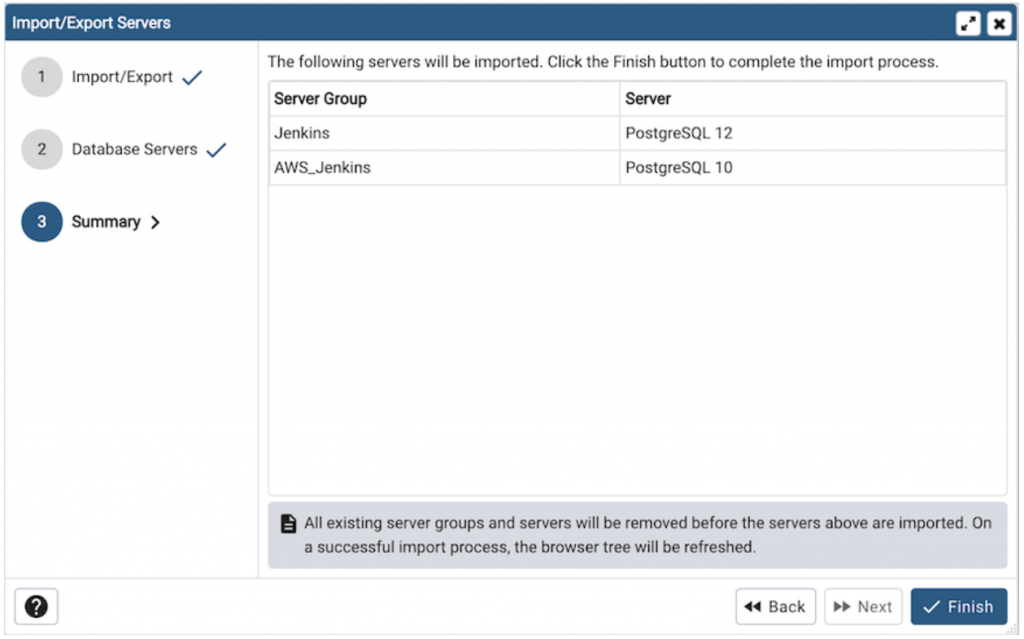
- Check the summary of the servers that are going to be imported/exported on the Summary page.
- Click the Finish button to close the wizard and execute the process.
How to use Import/Export Servers using “setup.py”
To export or import servers using ‘setup.py’ script, you must use the Python interpreter that is normally used to run pgAdmin to ensure that the required Python packages are available. In most packages, this can be found in the Python Virtual Environment that can be found in the installation directory.
Exporting Servers
To export the servers defined in an installation, simply invoke ‘setup.py’ with the ‘--dump-servers’ command line option, followed by the name (and if required, path) to the desired output file. By default, servers owned by the desktop mode user will be dumped (pgadmin4@pgadmin.org by default - see the DESKTOP_USER setting in ‘config.py’). This can be overridden with the ‘--user’ command line option.
There can be multiple configurations of pgAdmin on the same system. To dump the servers from a specific pgAdmin config DB file, ‘--sqlite-path’ option can be used. It is also recommended to use this option when running pgAdmin in desktop mode. By default the SQLITE_PATH setting in ‘config.py’ is taken.
For example (On RPM Installation): To export only certain servers, use the ‘--servers’ option and list one or more server IDs.
/usr/pgadmin4/venv/bin/python3 /usr/pgadmin4/web/setup.py --dump-servers output_file.json

# or, to specify a non-default user name:

/usr/pgadmin4/venv/bin/python3 /usr/pgadmin4/web/setup.py --dump-servers output_file.json --user user@example.com

# to specify a pgAdmin config DB file:

/usr/pgadmin4/venv/bin/python3 /usr/pgadmin4/web/setup.py --dump-servers output_file.json --sqlite-path /var/lib/pgadmin/pgadmin4.db
For example:
/usr/pgadmin4/venv/bin/python3 /usr/pgadmin4/web/setup.py --dump-servers output_file.json --server 1 2 5
Importing Servers
To import the servers defined in a JSON file, simply invoke ‘setup.py’ with the ‘--load-servers’ command line option, followed by the name (and if required, path) of the JSON file containing
the server definitions. Servers will be owned by the desktop mode user (pgadmin4@pgadmin.org by default - see the DESKTOP_USER setting in ‘config.py’). This can be overridden with the ‘--user’ command line option.
There can be multiple configurations of pgAdmin on the same system. The default behavior is for the imported servers to be added to the existent list, which might lead to duplicates. This can be overridden with the ‘--replace’ command line option, which will replace the list of servers with the newly imported one.
To load the servers into a specific pgAdmin config DB file, ‘--sqlite-path’ option can be used. It is also recommended to use this option when running pgAdmin in desktop mode. By default SQLITE_PATH setting in ‘config.py’ is taken.
For example(On RPM Installation):
/usr/pgadmin4/venv/bin/python3 /usr/pgadmin4/web/setup.py --load-servers input_file.json

# or, to replace the list of servers with the newly imported one:

/usr/pgadmin4/venv/bin/python3 /usr/pgadmin4/web/setup.py --load-servers input_file.json --replace

# or, to specify a non-default user name to own the new servers:

/usr/pgadmin4/venv/bin/python3 /usr/pgadmin4/web/setup.py --load-servers input_file.json --user user@example.com

# to specify a pgAdmin config DB file:

/usr/pgadmin4/venv/bin/python3 /usr/pgadmin4/web/setup.py --load-servers input_file.json --sqlite-path /var/lib/pgadmin/pgadmin4.db
If any Servers are defined with a Server Group that is not already present in the configuration database, the required Group will be created.
JSON format
The JSON file format used when importing or exporting servers is quite straightforward and simply contains a list of servers, with a number of attributes. The following attributes are required to be present in every server definition: Name, Group, Port, Username, SSLMode, MaintenanceDB and one of Host, HostAddr or Service.
Password fields cannot be imported or exported.
The following example shows both a minimally defined and a fully defined server:
 {
   "Servers": {
           "1": {
               "Name": "Minimally Defined Server",
               "Group": "Server Group 1",
               "Port": 5432,
               "Username": "postgres",
               "Host": "localhost",
               "SSLMode": "prefer",
               "MaintenanceDB": "postgres"
           },
           "2": {
               "Name": "Fully Defined Server",
               "Group": "Server Group 2",
               "Host": "host.domain.com",
               "HostAddr": "192.168.1.2",
               "Port": 5432,
               "MaintenanceDB": "postgres",
               "Username": "postgres",
               "Role": "my_role_name",
               "SSLMode": "require",
               "Comment": "This server has every option configured in the",
               "DBRestriction": "live_db test_db",
               "PassFile": "/path/to/pgpassfile",
               "SSLCert": "/path/to/sslcert.crt",
               "SSLKey": "/path/to/sslcert.key",
               "SSLRootCert": "/path/to/sslroot.crt",
               "SSLCrl": "/path/to/sslcrl.crl",
               "SSLCompression": 1,
               "Shared": false,
               "BGColor": "#ff9900",
               "FGColor": "#000000",
               "Service": "postgresql-10",
               "Timeout": 60,
               "UseSSHTunnel": 1,
               "TunnelHost": "192.168.1.253",
               "TunnelPort": 22,
               "TunnelUsername": "username",
               "TunnelAuthentication": 0
           }
       }
   }
Conclusion
Use the import/export servers wizard or command line options to import/export your existing database servers into a pgAdmin instance, for example when migrating to a new installation of pgAdmin or sharing server definitions with colleagues.