Why you should use Docker Compose

SUMMARY: This article explains the benefits of using Docker Compose for creating multiple container applications. It reviews the steps for setting up Docker Compose and connecting the PostgreSQL database.
Docker has made it easier to set up a local development environment. However, if you want to create more than one container for your application, you have to create several Docker files. This adds on the load of maintaining them and is also quite time-consuming.
Docker Compose solves this problem by allowing you to use a YAML file to operate multi-container applications at once. You can set the desired amount of containers counts, their builds, and storage designs, and then with a single set of commands you can build, run and configure all the containers.
Docker Compose is great for development, testing, and staging environments, as well as continuous integration workflows.
Clarity
Docker manages single containers
Docker Compose manages multiple container applications
Getting started with Docker Compose
Prerequisites
1. Docker Compose installed
2. Basic understanding of the Docker Compose command-line interface (CLI).
To use Docker and Docker Compose, you first have to install them on your machine. You can find instructions to install Docker on your platform here. You can find instructions to install and start Docker Compose on your platform here.
Usage of Docker Compose requires three steps:
1. Define the application environment with a Dockerfile
2. Define the application services in docker-compose.yml
3. Run docker-compose to start and run applications
Here is an example of what the docker-compose.yml file looks like :
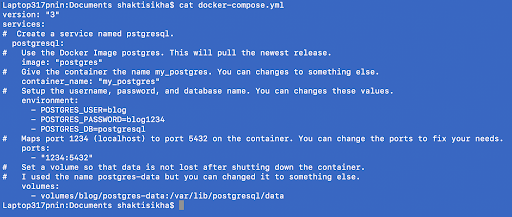
To start the PostgreSQL Docker container you only need to run one command. Make sure that you are at the same folder your yml file exists.
docker-compose up -d
Data Persistence
Once your container is up and running, if you delete your container, you also lose the data. To prevent this, you can use user-defined volumes so your data persists even after the container is lost. With user defined volumes, Docker Compose will create a container folder to store your database’s data on the user-defined mount point outside of your container.
You can make your container application down with the following command:
docker-compose down
The official Postgres image exposes port 5432 for the remote connectivity of the database. As shown in the sample docker-compose.yml file above, the incoming requests at the docker host port 1234 will be forwarded to the port 5432 of the database container, where the Postgres server can process it.
Connecting remotely to the PostgreSQL server
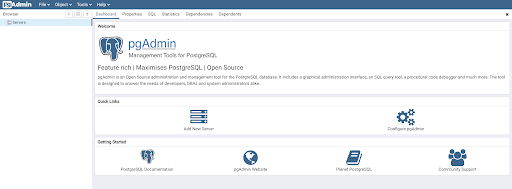
You can use psql client tools such as PgAdmin to access the database container remotely. By default the pgAdmin software opens with a link where you will get options to connect or add to remote database servers. In the dashboard you will find the option called “Add New Server.”
Give the server a name of your choice.
In the Connection tab, specify the database host and other details as asked of the database.
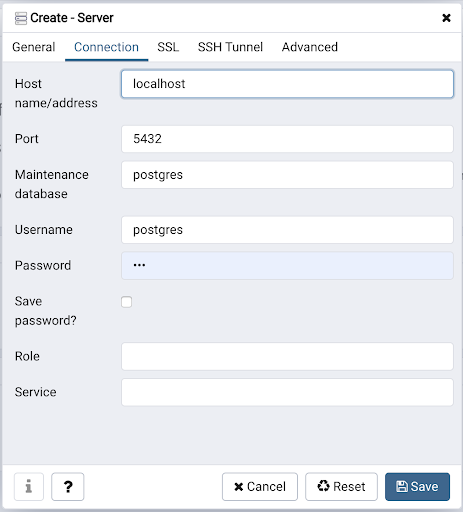
The address can be localhost if your pgAdmin client and database containers both are running at the same machine. If you are running the PostgreSQL container on a remote machine, then the IP address of the container machine will be needed here. In a nutshell, we call it the address of the Docker host as this is where the Docker is running.
Upon successful connection, you will be able to see all the internal activities of the containers database just as you can see them while insider the containers psql terminal.
Conclusion
We saw how to write a Docker Compose file for a containerized PostgreSQL database. You can now improvise the basic Docker Compose file to enhance your PostgreSQL containers as you wish by adding several database parameters to the file.
We also learned how to connect to the PostgreSQL database inside the container using both its own psql client in the container and also remotely using pgAdmin tool.