Bulk transactions with RESTful CRUD API using PostgreSQL and Spring Boot

A typical database-oriented application setup only must work with single operation SQL or RESTful execution. Your customers might only be sending the INSERT or UPDATE queries one at a time. We have covered this approach in part 2 for our series and have created a simple RESTful API that allows users to perform CRUD operations on a PostgreSQL database. More advanced and high-velocity solutions require an efficient solution that can handle thousands of database operations per second, per client.
Bulk or batch operations make sense when you are handling loads of data from a single origin—say, IoT or smart home devices. In the next section, you will learn why batching is needed when you are running a query multiple time.
Bulk Operations
In a database, each operation you perform, a SELECT or INSERT query in SQL, takes a trip to database engine to be committed. In a system with hundreds of queries each second, it can get difficult to maintain the performance and server efficiency for our database as well as web application. To solve this, we combine multiple queries and send them to the database in a single go. With PostgreSQL, you should be aware of INSERT statements with multiple values that get added in a single go:
INSERT INTO table_name (col1, col2, col3)
VALUES
(val1, val2, val3),
(val4, val5, val6),
(val7, val8, val9);
Executing this INSERT statement is equivalent to the following three INSERT statements in terms of result:
INSERT INTO table_name (col1, col2, col3)
VALUES (val1, val2, val3);

INSERT INTO table_name (col1, col2, col3)
VALUES (val4, val5, val6);

INSERT INTO table_name (col1, col2, col3)
VALUES (val7, val8, val9);
Their primary difference is how they sent the query to the server; read Inserting Data to learn more on this approach. Former approach inserts three records in a single go, whereas later one sends three queries to database engine to insert three records. PostgreSQL wraps these three queries in three transactions implicitly, adding an extra overhead; read more on Transactions for this.
JPA Support for Bulk Operations
Using the JPA model we created in previous posts, we can update it to support batch operations while continuing to support single record operations. JPA repository methods that we used previously, such as:
- Save
- Delete
- Update
All offer overloaded methods that can be used to work on a list of records. The overloaded methods provide a support for Iterable<T> to be used as argument instead of a single Entity type.
Updating Model
Note: If you have been following part 1 and part 2 of this blog, then you should update the existing classes for Model as well as Service and MVC routes. If you are reading this part as first one, then you can copy the code in your existing application.
We will rewrite the Person model to support the Sequential ID generation for the entity.
package com.demos.crud.data.models;

import javax.persistence.Column;
import javax.persistence.Entity;
import javax.persistence.GeneratedValue;
import javax.persistence.GenerationType;
import javax.persistence.Id;
import javax.persistence.Table;

@Entity
@Table(name = "people")
public class Person {

    @Id
    @GeneratedValue(strategy = GenerationType.SEQUENCE)
    @Column(name = "id")
    public Long id;

    @Column(name = "name")
    public String name;

    @Column(name = "role")
    public String role;

    public Person() {}

    public Person(long id, String name, String role) {
        this.id = id;
        this.name = name;
        this.role = role;
    }

    @Override
    public String toString() {

        StringBuilder builder = new StringBuilder();
        builder.append(String.valueOf(id));
        builder.append(", ");
        builder.append(name);
        builder.append(", ");
        builder.append(role);

        return builder.toString();
    }
}
This Entity will be used by JPA to enable batch insertions.
Updating Service and Implementation
Before we connect a Spring Boot MVC to our JPA repository, we need to intercept it via a service that will expose only necessary functions and will hide sensitive resources such as the JPA repositories. To handle this, we create a service that entails the methods that our MVC will use:
package com.demos.crud.data.services;

import java.util.List;
import com.demos.crud.data.models.Person;

public interface PeopleService {
    List<Person> findAllPeople();
    Person findById(long id);
    List<Person> findByIds(List<Long> id);

    Person insert(Person p);
    List<Person> insertAll(List<Person> p);

    boolean delete(Long id);
    boolean deleteAll(List<Person> ids);

    boolean update(Person p);
    boolean updateAll(List<Person> p);
}
Our PeopleService exposes CRUD functions, for single entities as well as for list of entities where we apply batch operations. We will add implementation for this in our Java class that will be injected to MVC RESTful controllers. Create a new class PeopleServiceImpl and implement the PeopleService interface to connect to the JPA repository.
package com.demos.crud.data.services;

import java.util.List;
import java.util.Optional;
import com.demos.crud.data.models.Person;
import com.demos.crud.data.repositories.PersonRepository;
import org.springframework.beans.factory.annotation.Autowired;
import org.springframework.stereotype.Service;

@Service
public class PeopleServiceImpl implements PeopleService {

    @Autowired
    private PersonRepository repository;

    @Override
    public List<Person> findAllPeople() {
    return (List<Person>)repository.findAll();
    }

    @Override
    public Person findById(long id) {
        Optional<Person> result = repository.findById(id);
        if (result.isPresent()) {
            return result.get();
        } else {
            return null;
        }
    }

    @Override
    public List<Person> findByIds(List<Long> ids) {
        return (List<Person>)repository.findAllById(ids);
    }

    @Override
    public Person insert(Person p) {
        return repository.save(p);
    }

    @Override
    public List<Person> insertAll(List<Person> p) {
        return (List<Person>)repository.saveAll(p);
    }

    @Override
    public boolean delete(Long id) {
        try {
            repository.deleteById(id);
            return true;
        } catch (Exception e) {
            System.out.println(e.getMessage());
            return false;
        }
    }

    @Override
    public boolean deleteAll(List<Person> ids) {

        try {
            repository.deleteAll(ids);
            return true;
        } catch (Exception e) {
            return false;
        }
    }

    @Override
    public boolean update(Person p) {

        try {
            repository.save(p);
            return true;
        } catch (Exception e) {
            System.out.println(e.getMessage());
            return false;
        }
    }

    @Override
    public boolean updateAll(List<Person> p) {
        try {
            repository.saveAll(p);
            return true;
        } catch (Exception e) {
            return false;
        }
    }
}
This is where we connect our service to JPA repository and execute functions in repository. A few things to note here:
- JPA repository uses Java’s Iterable<T> type as parameter for functions with lists.
- JPA repository methods that take an Iterable<T> return an Iterable<T> of the entities that have been persisted in the database.
- You can name methods of your implementation however you like them, but it is helpful to name them like repository’s methods. But you should avoid exposing the repository to RESTful controllers for security reasons.
In the code above, we have used List<T> type and passed it to the methods that require an Iterable<T>. It is possible because Iterable<T> is parent for List<T>, and List<T> is widely used container type in Java applications.
Updating MVC RESTful Routes
Now that we have written the underlying DAO service, next step is to connect the service to our RESTful controller and create HTTP routes that support HTTP methods and their respective operations in the system. Two things to keep in mind while developing a batch-supportive endpoint:
- Batch endpoints are expected to in-take a huge amount of data. You can accept input in batch, or batch the data after accepting it from endpoint. We select the former, we accept the input in batch (a List<T>).
- It is suitable to create a separate endpoint for single entity operation and a separate endpoint for batch operations. This can help your application take better decision and perform better in batch tasks and do less work and execute the SQL statement for single entity operations.
We take these in mind and write the operations for RESTful controller:
package com.demos.crud.controllers.apis;

import java.util.ArrayList;
import java.util.List;
import com.demos.crud.data.models.Person;
import com.demos.crud.data.services.PeopleService;
import org.springframework.beans.factory.annotation.Autowired;
import org.springframework.web.bind.annotation.DeleteMapping;
import org.springframework.web.bind.annotation.GetMapping;
import org.springframework.web.bind.annotation.PathVariable;
import org.springframework.web.bind.annotation.PostMapping;
import org.springframework.web.bind.annotation.PutMapping;
import org.springframework.web.bind.annotation.RequestBody;
import org.springframework.web.bind.annotation.RequestMapping;
import org.springframework.web.bind.annotation.RestController;

@RestController()
@RequestMapping("/api/people")
public class PeopleApiController {

    private static final String REQUEST_NO_BODY = "Request does not contain a body";

    @Autowired
    PeopleService peopleService;

    @GetMapping("")
    public List<Person> getAllPeople() {
        return peopleService.findAllPeople();
    }

    @GetMapping("{id}")
    public Person getPerson(@PathVariable long id) {
        return peopleService.findById(id);
    }

    @PostMapping("")
    public String addPerson(@RequestBody Person person) {
        if(person != null) {
            peopleService.insert(person);
            return "Added a person";
        } else {
            return REQUEST_NO_BODY;
        }
    }

    @PostMapping("bulk")
    public String addPeople(@RequestBody List<Person> people) {
        if(people != null && !people.isEmpty()) {
            peopleService.insertAll(people);
            return String.format("Added %d people.", people.size());
        } else {
            return REQUEST_NO_BODY;
        }
    }

    @DeleteMapping("{id}")
    public String deletePerson(@PathVariable("id") long id) {
        if(id > 0) {
            if(peopleService.delete(id)) {
                return "Deleted the person.";
            } else {
                return "Cannot delete the person.";
            }
        }
        return "The id is invalid for the person.";
    }

    @DeleteMapping("bulk")
    public String deletePeople(@RequestBody List<Person> ids) {
        if(!ids.isEmpty()) {
            if(peopleService.deleteAll(ids)) {
                return "Deleted the person.";
            } else {
                return "Cannot delete the person.";
            }
        }
        return "The request should contain a list of people to be deleted.";
    }

    @PutMapping("")
    public String updatePerson(@RequestBody Person person) {
        if(person != null) {
            peopleService.update(person);
            return "Updated person.";
        } else {
            return REQUEST_NO_BODY;
        }
    }

    @PutMapping("bulk")
    public String updatePeople(@RequestBody List<Person> people) {
        if(people != null) {
            peopleService.updateAll(people);
            return "Updated people.";
        } else {
            return REQUEST_NO_BODY;
        }
    }
}
The controller contains an additional “/bulk” endpoint for each HTTP verb that operates on a list of objects.
Enable batch support
Last thing to configure is to edit your application.properties file to enable a batch_size for the Hibernate operations. This is the size that is used to send queries in a batch/bulk to the database. Append these configurations to enable:
spring.jpa.properties.hibernate.jdbc.batch_size=5
spring.jpa.properties.hibernate.order_inserts=true
You can configure the batch_size anywhere from 2 to 50 based on your system configuration. Note that a larger batch size will require more memory and might cause memory overflow. The complete file is:
## default connection pool
spring.datasource.hikari.connectionTimeout=20000
spring.datasource.hikari.maximumPoolSize=5
spring.jpa.generate-ddl=false

## PostgreSQL
spring.datasource.url=jdbc:<postgresql://172.17.0.2:5432/postgres>
spring.datasource.username=<username>
spring.datasource.password=<password>

# Database schema
spring.datasource.hikari.schema=techwriting
spring.jpa.properties.hibernate.jdbc.batch_size=5
spring.jpa.properties.hibernate.order_inserts=true

# drop and recreate table again, you should comment this in production
spring.jpa.hibernate.ddl-auto=create
Note that the default connection pool settings are ad-hoc for testing workload and use case and not recommended settings for your production workloads. You should consult your DBA and Ops team to decide the settings for connection pooling.
In the next section you will see how we can pass the data to these controllers and how Spring Boot will parse the data so framework can process it.
Consuming API
We will use Postman to send the queries to Java web application, and OmniDB as admin panel for PostgreSQL to review the state of database tables. Before we start, this is the state of our database tables:
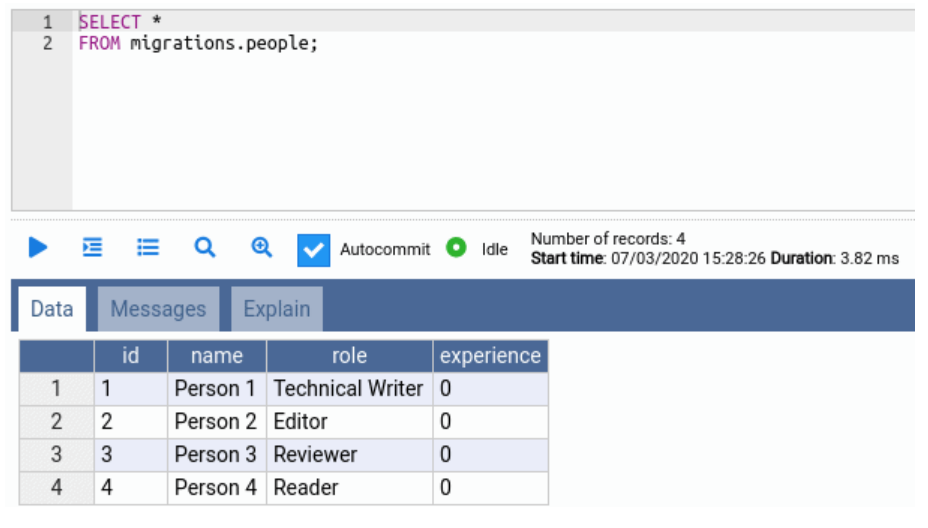
We will now send requests to our Java application’s endpoints and show how they mutate the table.
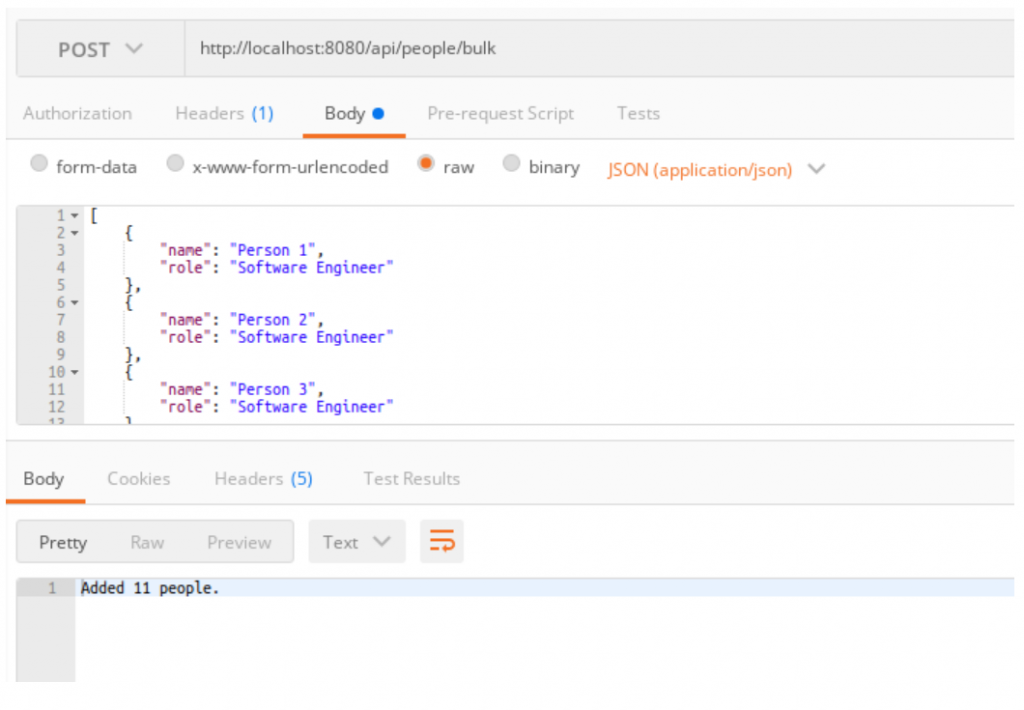
Bulk Insertion
We can use the POST endpoint to insert the data in the database. The endpoint to be used is “http://localhost:8080/api/people/bulk” and we submit a JSON array with details of people. I created a list with 11 elements:
[
{
"name": "Person 1",
"role": "Software Engineer"
},
// redundant part removed
{
"name": "Person 11",
"role": "Software Engineer"
}
]
Executing the code would create the records in the database.
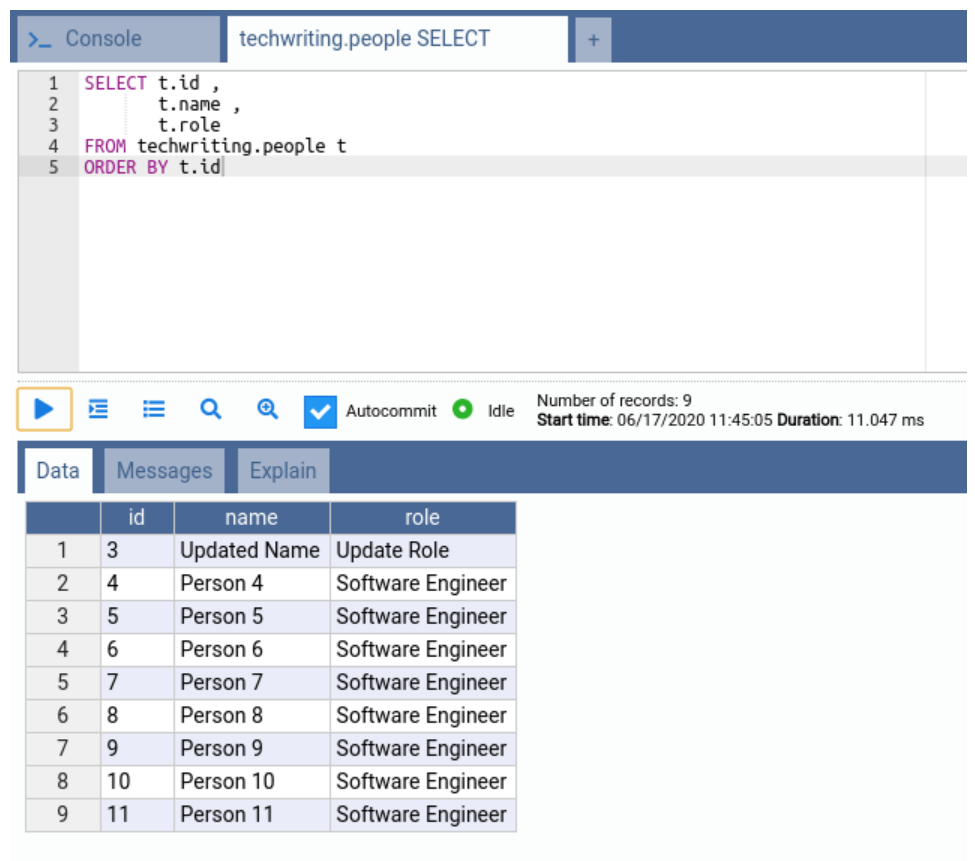
Our code executed and saved 11 people from the list to the database. We can review the PostgreSQL table for the content using the following SQL in OmniDB:
SELECT t.id ,
       t.name ,
       t.role
FROM techwriting.people t
ORDER BY t.id
Now the database contains 11 records that we just created in the statement above; see “Verifying Batch Operations” to understand how the batch statements are created in JPA.
Bulk Updating
To perform a bulk update, we will use the same endpoint but send a PUT request. For testing, we will send an HTTP body with two people and their updated details:
[
{
"id": 2,
"name": "Updated Name",
"role": "Update Role"
},
{
"id": 3,
"name": "Updated Name",
"role": "Update Role"
}
]
This request should update 2 people (with ID 2 and 3).
We can now verify the data in our database table using the SQL statement again:

Table contains the updated records.
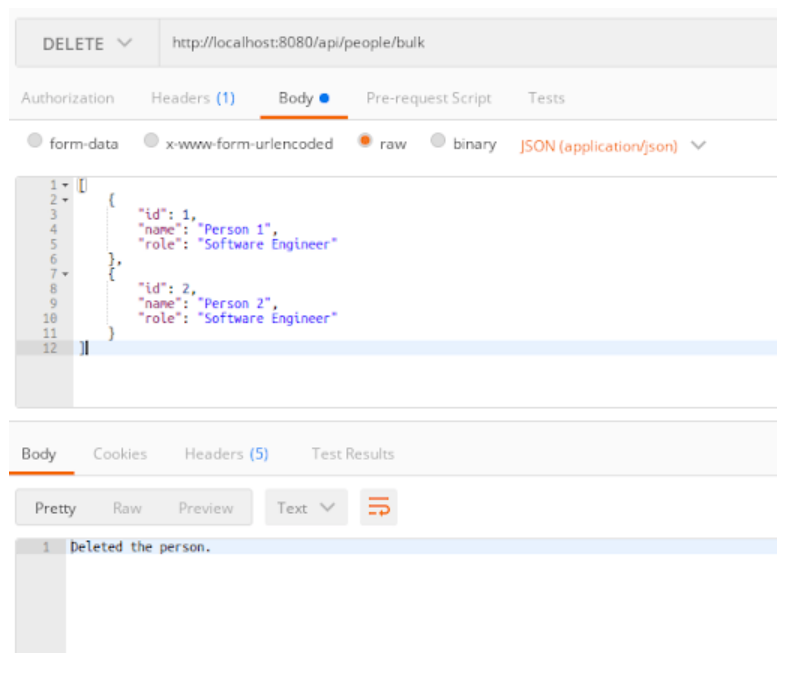
Bulk Deletion
Similarly, we can execute the deletion of records in batch using the same endpoint but DELETE verb for HTTP. In the delete request we need to post the person records that we want to delete. JPA does not contain a delete method that accepts a List of ID type (Long in Person case). So, we need to send List<Person>.
[
{
"id": 1,
"name": "Person 1",
"role": "Software Engineer"
},
{
"id": 2,
"name": "Person 2",
"role": "Software Engineer"
}
]
Executing the code would now delete the records from the table:
We can check the database table for the state:
Based on this, you can see that the data has been deleted. Now the interesting bit is to verify if the statements were executed in batch.
Verifying Batch Operations
We have seen how to write the code that would perform batch operations, to verify whether our JPA sends the query in batches or not, we can change the application.properties file to log and show the executions and if they contain a batch operation. Add this line to the end of your application.properties file to show the statistics for queries:
# enable the query statistics
spring.jpa.properties.hibernate.generate_statistics=true
First, if we use the IDENTITY generation mode for the primary key in Person entity, we will get the following log printed for our SQL statements (e.g. the bulk insert operation):
1024993 nanoseconds spent acquiring 1 JDBC connections;
0 nanoseconds spent releasing 0 JDBC connections;
469016 nanoseconds spent preparing 11 JDBC statements;
81414030 nanoseconds spent executing 11 JDBC statements;
0 nanoseconds spent executing 0 JDBC batches;
0 nanoseconds spent performing 0 L2C puts;
0 nanoseconds spent performing 0 L2C hits;
0 nanoseconds spent performing 0 L2C misses;
438674 nanoseconds spent executing 1 flushes (flushing a total of 11 entities and 0 collections);
0 nanoseconds spent executing 0 partial-flushes (flushing a total of 0 entities and 0 collections)
If we edit the generation strategy to SEQUENCE (or other JPA-supported modes), like we have done in our model above, we will see:
5330717 nanoseconds spent acquiring 1 JDBC connections;
0 nanoseconds spent releasing 0 JDBC connections;
14316641 nanoseconds spent preparing 12 JDBC statements;
1764945 nanoseconds spent executing 11 JDBC statements;
9864966 nanoseconds spent executing 3 JDBC batches;
0 nanoseconds spent performing 0 L2C puts;
0 nanoseconds spent performing 0 L2C hits;
0 nanoseconds spent performing 0 L2C misses;
34051820 nanoseconds spent executing 1 flushes (flushing a total of 11 entities and 0 collections);
0 nanoseconds spent executing 0 partial-flushes (flushing a total of 0 entities and 0 collections)
In this approach, you can see there are 3 JDBC batches that were executed. We had 11 elements in our request and batch_size of 5, so 3 batches were made for the query.
The reason is, that IDENTITY generation mode cannot be predicted by JPA and the ID needs to be captured from database engine. Therefore, JPA will send each INSERT to the database to capture the new primary key. Therefore, Hibernate disables batches implicitly, and to use the batch features you can modify the primary key value generation.
You can enable this setting and then rerun the code above to see how batches are executed from JPA’s perspective.
Read this article to learn more on best practices for primary key in bulk operations.
Conclusion
In this article, you learned about bulk operations in PostgreSQL database and how JPA provides the support for bulk operations with JPA in Spring Boot. You learned how to create the bulk support in your JPA-abstraction services, what Java types to use and how JPA maps them to PostgreSQL types internally. You also learned how to write RESTful APIs and share the data between client and server applications.
We concluded the article by suggesting some tips and how to verify the batch execution with JPA.