Abstract
This article provides step-by-step instructions for using the EDB Postgres Backup and Recovery Tool (BART) to save PostgreSQL backups to Amazon AWS S3.
Step 1: Install BART on master and standby servers
Step 2: Install and configure S3FS-FUSE on master and standby servers
Step 3: Configure BART on master and standby servers
Step 4: Test BART configuration on master and standby servers
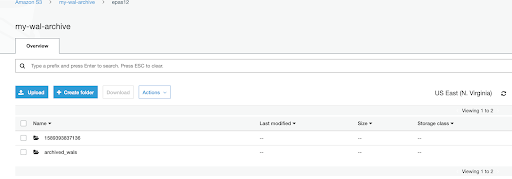
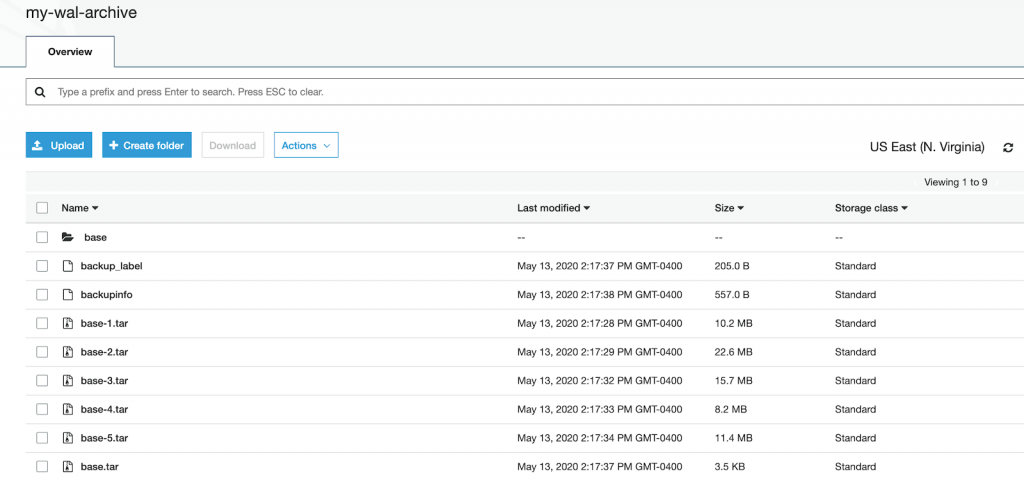
Step 5: Verify that backup and archived WAL files are stored in S3 (optional)
EDB Postgres Backup and Recovery Tool (BART) allows users to configure and schedule backups, apply backup retention policies, and restore databases to a point in time using simple commands. Using BART, users can schedule full weekly and daily incremental backups of their PostgreSQL and EDB Postgres Advanced Server databases.
There are many customers who want to store their backups on cloud storage solutions like AWS S3 and would like BART to store backups on S3 storage. Since BART doesn’t have direct integration with AWS S3, there are alternatives such as mounting S3 storage as NFS onto the BART host and taking backup. AWS Storage Gateway is one option, but there are other solutions available, such as ObjectiveFS (commercial) and S3FS-FUSE (free open source), which can be used to mount S3 storage to servers, if you don’t want to pay for an AWS Storage Gateway server.
In this post, I have used the open source S3FS-FUSE solution to show how it can be used to mount S3 storage on the BART/DB host for storing backups on S3.
In my setup, I am running a master and two standby servers using Postgres streaming replication and monitored by EDB Failover Manager (EFM). The virtual IP (VIP) is assigned to the master server. The VIP can be replaced by the physical IP address of the database server, in case streaming replication is not set up.
Here is my setup:
[root@localhost etc]# /usr/edb/efm-3.9/bin/efm cluster-status efm

Cluster Status: efm


Agent Type  Address              Agent  DB       VIP

-----------------------------------------------------------------------

Standby     xxx.xx.xx.55         UP     UP       xxx.xx.xx.150

Master      xxx.xx.xx.59         UP     UP       xxx.xx.xx.150*

Standby     xxx.xx.xx.60         UP     UP       xxx.xx.xx.150
Allowed node host list:
xxx.xx.xx.55 xxx.xx.xx.59 xxx.xx.xx.60
Membership coordinator:
xxx.xx.xx.60
Standby priority host list:
xxx.xx.xx.55 xxx.xx.xx.60
Promote Status:
DB Type     Address              WAL Received LSN   WAL Replayed LSN   Info

---------------------------------------------------------------------------

Master      xxx.xx.xx.59                            0/AED01D0

Standby     xxx.xx.xx.55         0/AED01D0          0/AED01D0

Standby     xxx.xx.xx.60         0/AED01D0          0/AED01D0


Standby database(s) in sync with master. It is safe to promote.
Step 1: Install BART on master and standby servers
As root:
yum install edb-bart
Create bart user and group:
[root@localhost ~]# groupadd bart

[root@localhost ~]# useradd bart -g bart

[root@localhost ~]# id bart

uid=1004(bart) gid=1004(bart) groups=1004(bart)
Create a backup directory:
mkdir -p /opt/backup
Change ownership:
chown bart:bart /opt/backup
Add bart command to PATH in .bash_profile for bar user:
su – bart

vi .bash_profile

export PATH=$PATH:/usr/edb/bart/bin
Save the file.
Step 2: Install and configure S3FS-FUSE on master and standby servers
As root:
yum install s3fs-fuse
Store your S3 access key and secret key in ~/.passwd-s3fs file:
echo “<ACCESSKEY>:<SECRETKEY>” > ~/.passwd-s3fs

chmod 0600 ~/.passwd-s3fs
Mount your S3 bucket to /opt/backup file system.
Add the following entry in /etc/fstab:
s3fs#my-wal-archive   /opt/backup    fuse

_netdev,rw,nosuid,nodev,allow_other,nonempty 0 0
Run the following command to mount the directory:
mount -a
Step 3: Configure BART on master and standby servers
As root:
cd /usr/edb/bart/etc

cp bart.cfg.sample bart.cfg
Add/update following sections:
[BART]

bart_host= bart@xxx.xx.xx.150

backup_path = /opt/backup

pg_basebackup_path = /usr/edb/as12/bin/pg_basebackup

logfile = /tmp/bart.log

scanner_logfile = /tmp/bart_scanner.log

thread_count = 5


[EPAS12]

host = xxx.xx.xx.150

port = 5444

user = repuser

cluster_owner = enterprisedb

description = "EPAS 12 Server"

allow_incremental_backups = enabled
Save bart.cfg.
As enterprisedb user, create a replication user:
-bash-4.2$ /usr/edb/as12/bin/psql -h xxx.xx.xx.150 -p 5444 edb

Password for user enterprisedb:

psql (12.2.3)

Type "help" for help.


edb=# CREATE ROLE repuser WITH LOGIN SUPERUSER PASSWORD 'repuser';
CREATE ROLE
Modify pg_hba.conf and add entry for replication database user:
host replication repuser xxx.xx.xx.0/24 md5
Reload conf:
-bash-4.2$ /usr/edb/as12/bin/pg_ctl reload -D /var/lib/edb/as12/data

server signaled
Add .pgpass entry in bart user’s home directory:
su - bart

vi ~/.pgpass

xxx.xx.xx.150:5444:*:repuser:repuser


chmod 0600 ~/.pgpass
Setup a password-less ssh connection.
As root:
vi /etc/ssh/sshd_config

Set PubkeyAuthentication to yes
Reload sshd service:
systemctl reload sshd


su – bart


ssh-keygen -t rsa

cd .ssh

cat id_rsa.pub > authorized_keys

chmod 0600 authorized_keys
scp the id_rsa.pub from other servers and append it to authorized_keys:
e.g.:
scp root@xxx.xx.xx.59:/home/bart/.ssh/id_rsa.pub /tmp/bart.pub

cat /tmp/bart.pub >> authorized_keys
Generate the ssh keys for enterprisedb user and append it to authorized_keys for bart user:
su – enterprisedb

ssh-keygen -t rsa

cd .ssh

cp id_rsa.pub /tmp/enterprisedb.pub


su – bart

cd .ssh

cat /tmp/enterprisedb.pub >> authorized_keys
Make sure to scp enterprisedb ssh keys from other servers and append it to bart user’s authorized_keys.
Repeat the process on all servers where BART is installed.
Test to make sure you are able to do password-less ssh connections to other servers using bart user:
su - bart

ssh bart@xxx.xx.xx.55


su – enterprisedb

ssh bart@xxx.xx.xx.55
Step 4: Test BART configuration on master and standby servers
su - bart


bart check-config

INFO:  Verifying that pg_basebackup is executable

INFO:  success - pg_basebackup(/usr/edb/as12/bin/pg_basebackup) returns version 12.200000


bart show-servers -s epas12

SERVER NAME         : epas12

HOST NAME           : xxx.xx.xx.150

USER NAME           : repuser

PORT                : 5444

REMOTE HOST         :

RETENTION POLICY    : none

DISK UTILIZATION    : 0.00 bytes

NUMBER OF ARCHIVES  : 0

ARCHIVE PATH        : /opt/backup/epas12/archived_wals

ARCHIVE COMMAND     : (disabled)

XLOG METHOD         : fetch

WAL COMPRESSION     : disabled

TABLESPACE PATH(s)  :

INCREMENTAL BACKUP  : ENABLED

DESCRIPTION         : "EPAS 12 Server"


[bart@localhost ~]$ bart backup -s epas12

INFO:  DebugTarget - getVar(checkDiskSpace.bytesAvailable)

INFO:  new backup identifier generated 1589393837136

INFO:  creating 5 harvester threads

NOTICE:  WAL archiving is not enabled; you must ensure that all required WAL segments are copied through other means to complete the backup

INFO:  backup completed successfully

INFO:

BART VERSION: 2.5.3

BACKUP DETAILS:

BACKUP STATUS: active

BACKUP IDENTIFIER: 1589393837136

BACKUP NAME: none

BACKUP PARENT: none

BACKUP LOCATION: /opt/backup/epas12/1589393837136

BACKUP SIZE: 68.05 MB

BACKUP FORMAT: tar

BACKUP TIMEZONE: America/New_York

XLOG METHOD: fetch

BACKUP CHECKSUM(s): 0

TABLESPACE(s): 0

START WAL LOCATION: 0000000E000000000000000B

BACKUP METHOD: streamed

BACKUP FROM: master

START TIME: 2020-05-13 14:17:17 EDT

STOP TIME: 2020-05-13 14:17:36 EDT

TOTAL DURATION: 19 sec(s)


[bart@localhost ~]$ bart show-backups

 SERVER NAME   BACKUP ID       BACKUP NAME   BACKUP PARENT   BACKUP TIME               BACKUP SIZE   WAL(s) SIZE   WAL FILES   STATUS


 epas12        1589393837136   none          none            2020-05-13 14:17:36 EDT   68.05 MB      0.00 bytes    0           active


[bart@localhost ~]$ cd /opt/backup

[bart@localhost backup]$ cd eaps12

-bash: cd: eaps12: No such file or directory

[bart@localhost backup]$ ls

basebackups_005  epas10  epas11  epas12  wal_005

[bart@localhost backup]$ cd epas12

[bart@localhost epas12]$ ls

1589393837136  archived_wals

[bart@localhost epas12]$ ls -l

total 1

drwxrwxr-x. 1 bart bart 0 May 13 14:17 1589393837136

drwxrwxr-x. 1 bart bart 0 May 13 12:48 archived_wals

[bart@localhost epas12]$ cd 1589393837136/

[bart@localhost 1589393837136]$ ls -l

total 69691

-rw-rw-r--. 1 bart bart      557 May 13 14:17 backupinfo

-rw-rw-r--. 1 bart bart      205 May 13 14:17 backup_label

drwxrwxr-x. 1 bart bart        0 May 13 14:17 base

-rw-rw-r--. 1 bart bart 10655232 May 13 14:17 base-1.tar

-rw-rw-r--. 1 bart bart 23749120 May 13 14:17 base-2.tar

-rw-rw-r--. 1 bart bart 16449024 May 13 14:17 base-3.tar

-rw-rw-r--. 1 bart bart  8587264 May 13 14:17 base-4.tar

-rw-rw-r--. 1 bart bart 11913728 May 13 14:17 base-5.tar

-rw-rw-r--. 1 bart bart     3584 May 13 14:17 base.tar
Step 5: Verify that backup and archived WAL files are stored in S3 (optional)
Please note that archived wals will only be stored in S3 if you have set up archiving and archived command in postgresql.conf. Please follow instructions from the BART guide.


